~~~~~~~~~~~~~~~~~~~~~~~~~~~~~~~~~~~~~~~~~~~
Live Earth Farm (Com)Post
22nd Harvest Week, Season 12
August 27th - September 2nd, 2007
~~~~~~~~~~~~~~~~~~~~~~~~~~~~~~~~~~~~~~~~~~~
(paper
version of newsletter discontinued)
In this issue
--Greetings from Farmer...Ken?
--Documented benefits to eating organic
--When what you get differs from the 'what's in the box'
list
--Live Earth Farm Kids
--Pictures around the farm
--What's in the box this week
--Notes from Debbie's Kitchen
--Calendar
--Contact Information
" Seventy-two labors brought us this food. We should
know how it comes to us. "
~ Traditional Zen chant before a meal
Greetings from Farmer... Ken?
~~~~~~~~~~~~~~~~~~~~~~~~~~~~~~~~~~~~~~~~~~~~~~~~
Hello everyone, I’m Ken Eklund, and I’m pinch-hitting for Farmer Tom this week. There has been a death in the extended Broz family, so we’re enabling Tom and Constance to focus on family matters. Our best wishes go with them at this time.
I’m afraid I can’t give you the insights about “What’s Going On At The Farm” that you’ve come to expect from Tom. Although I am Debbie’s husband (and the chief beneficiary of what goes on in Debbie’s Kitchen), mostly I am just a member. One of the people (and there are 2,000 of us?) that doesn’t usually pick up the share or prep it for the refrigerator or parse its contents or even cook with it much, but partakes of its bounty every day.
What I can talk about are the connections that the farm forges, even for me. I grew up in a desert, where the land did not provide for you, not even shade. So my relationship with the land, when I moved to California, started pretty much at zero.
But Debbie and I joined the Live Earth Farm CSA pretty early on (Year Two), and in time the farm beckoned often enough to me that I responded. It’s pretty remarkable, once you begin to trace your food upstream, what deep connections you can find.
 First of all, there are the farm festivals. If you haven’t been
to one, you really should go. (The next one is the Fall
Harvest Festival on Saturday, October 20; there is also a Summer
Solstice festival.)
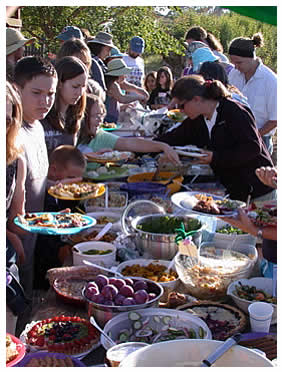
What goes on at a festival? There’s
music and food, about eleventy zillion kids running around, farm happenings
such as cheesemaking and bread baking – but
amid it all there’s just space to walk the farm. This is where it
all started for me – getting out on the land and seeing things
grow.
First of all, there are the farm festivals. If you haven’t been
to one, you really should go. (The next one is the Fall
Harvest Festival on Saturday, October 20; there is also a Summer
Solstice festival.)
What goes on at a festival? There’s
music and food, about eleventy zillion kids running around, farm happenings
such as cheesemaking and bread baking – but
amid it all there’s just space to walk the farm. This is where it
all started for me – getting out on the land and seeing things
grow.In the greenhouse, life is just beginning. Walk through the orchard, and there’s fruit on the tree. Over by the chickens is the compost pile, where the farm’s bounty returns once again to the earth.
Next, there are the people. I mean, you’re all nice and everything, but there’s more. I find that fellow Live Earth Farm members share an attitude and awareness about what sustains us. I also find a quiet courage (not always so quiet) in them. We have all made decisions to live our lives differently, to embrace again the ties to the earth and the seasons. It’s great for me to walk in that community; listening to others, I understand better the choices I’ve made, and those I’ve yet to make.
Although Debbie usually goes to pick up our box, sometimes I go along. It’s pretty fun – we ride our bikes – and often we run into Dan or Stacy (Scott, the site hosts in Willow Glen) or some of our other friends and neighbors who also pick up there. But often I go because I need a boost. The world can seem to be out of control, or falling apart, or steamrollering in the wrong direction, or all of these at once. In those moments it’s balm just to see people come and pick up their veggies and fruit. Here’s a system that’s quietly working against the craziness.
The Buddhists have a thankful saying, “Seventy-two labors brought this food to us” – where “seventy-two” is a way of saying “everyone’s.” And the saying continues as “We should know how this food comes to us.” Maybe at first I would have interpreted these words to mean that we have an obligation to realize where our food comes from (and a responsibility to choose well). But lately I read this saying entirely differently. It’s not an obligation or a responsibility, it’s an opportunity – we should “know how this food comes to us” because it’s really a cool story. One of the oldest, and best. A classic.
Just my two cents – thanks for listening. - Ken
<back to top>
Documented benefits to eating organic
~~~~~~~~~~~~~~~~~~~~~~~~~~~~~~~~~~~~~~~~~~~~~~~~
Member Bettina Baumgart forwarded me this article from the July 17 issue of
the NY Times, written by Eric Nagourney.
People who choose organic fruits and vegetables to avoid pesticides
and other chemicals may have another reason to buy organic. A new study
finds that organically grown tomatoes have higher levels of flavonoids
...
Writing
in The Journal of Agriculture and Food Chemistry, researchers said the level of one flavonoid in the organic tomatoes was almost twice
as high as that in conventionally grown tomatoes.
Because of evidence that flavonoids may fight age-related diseases,
the study said, researchers have been trying to develop crops with higher
levels of them. In the United States, only potatoes are eaten more often
than tomatoes.
The researchers, from the University of California, Davis, looked at
tomatoes grown over a 10-year period in organic fields and regular ones.
Not only did the organic tomatoes score better, they said, but over
time their flavonoid levels kept increasing.
The lead author of the study, Alyson E. Mitchell, said she was surprised
at the extent of the difference.
"We sort of went into this expecting higher levels," Dr.
Mitchell said. "We did not expect to find the levels that we found."
The study offered several possible explanations, most having to do
with the fertility of the soil. Organic farms, the researchers said,
gradually improve the soil by letting organic matter accumulate through
the use of cover crops, compost and manure.
The study also said flavonoids were among a group of metabolites produced
by plants in part to ward off pests. So it is possible, the researchers
said, that the increased pressure on organic crops from pests may result
in more flavonoids.
<back to top>
When what you get differs from the 'what's in
the box' list
~~~~~~~~~~~~~~~~~~~~~~~~~~~~~~~~~~~~~~~~~~~~~~~~
You picked up your share... and something on the list is missing; what
you’re getting doesn’t seem to match what you remember you
were supposed to be getting. When you think this, you are probably correct.
What you may not realize, unless you look more carefully, is that we put
something else in your box that wasn’t on the list – Farmer
Tom has made a substitution. This is actually quite normal, and happens
to some extent almost every week.
There is always a delay between the time Tom makes his projections
of what we’ll have for the coming week’s boxes, and the
time we actually harvest the fruit and veggies and pack your boxes.
A lot can happen in a few days. Farming is nothing like manufacturing,
where quantities of inanimate objects are cranked out in measurable
amounts according to a schedule that the manufacturer controls. When
you’re farming – for a CSA in particular – you are
growing many different types of crops simultaneously, and although you
try to time plantings and harvests for a predictable result, there are
so many things that can change or surprise you on seemingly a moment’s
notice: a field does not produce as much of a particular crop as anticipated,
or there were field conditions which rendered a crop unsuitable for
harvest (such as an infestation of pests, or heat causing something
to prematurely bolt). Conversely, sometimes we’ll have such a
bounty of something that we’ll include more of that item and leave
out something else that can wait. It is, as Tom always loves to say,
an intricate dance.
Last week was a perfect example: the Armenian cucumbers. We talked
about them, gave you pictures, and packed Wednesday’s shares no
problem. But when we harvested for Thursday’s shares we came up
short, because some of the cucumbers were, believe it or not, too huge
to fit in the boxes! So the big boys went to market (Farmers Market),
and Tom called the folks at Nagamini Nursery, a local organic grower
that specializes in cucumbers, and was able to get English cucumbers
to put into the boxes when he ran out of Armenians. Usually we try to
make substitutions from our own fields, as much as possible. The week
before last, for example, we were running short on golden beets, but
had lots of beautiful spinach, and so some members got spinach instead
of beets.
What’s most important to understand is that Tom is very generous
when it comes to packing your shares, and if anything, he will give you
more food rather than less. So please be understanding when your share
does not contain what you expected. Think of the ‘what’s in
the box list’ as a guide... but be prepared for small surprises,
and trust that we will do our best to give you the best we can coax from
Mother Nature.
<back to top>
Live Earth Farm Kids
~~~~~~~~~~~~~~~~~~~~~~~~~~~~~~~~~~~~~~~~~~~~~~~~
This is a periodic inclusion in the newsletter. Send us your favorite
picture and story of your child interacting with our farm, or the goodies
in your weekly share!
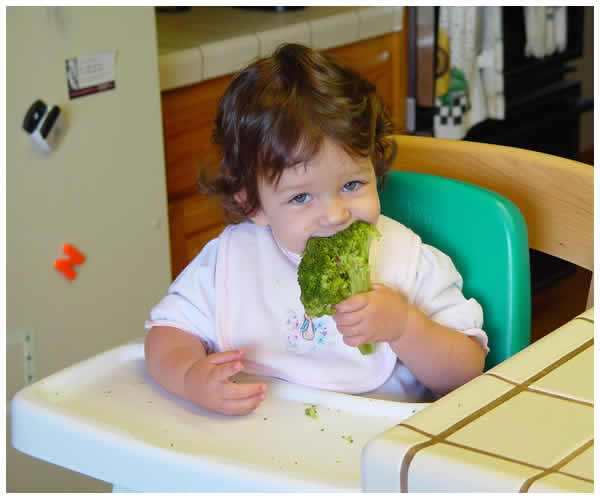
Member Karen Munshi is this week’s contributor. Karen says, “Attached
is a picture of our youngest I’ve been meaning to send. Tonight at dinner
reminded me. Ellie had 4 M&M's on her high chair tray and a broccoli - she
grabbed the latter and started eating it while the M&M's sat there. Oh how
I wished I had a camera nearby!”

<back to top>
Pictures around the farm
~~~~~~~~~~~~~~~~~~~~~~~~~~~~~~~~~~~~~~~~~~~~~~~~
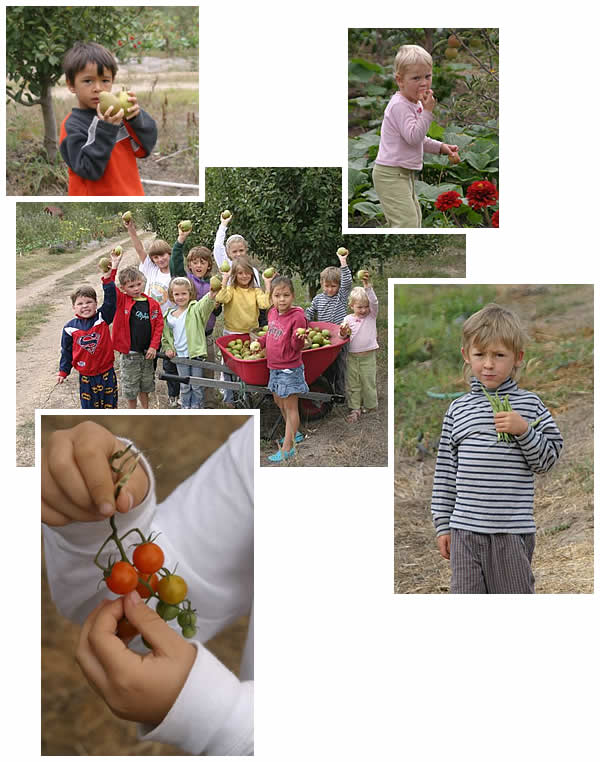
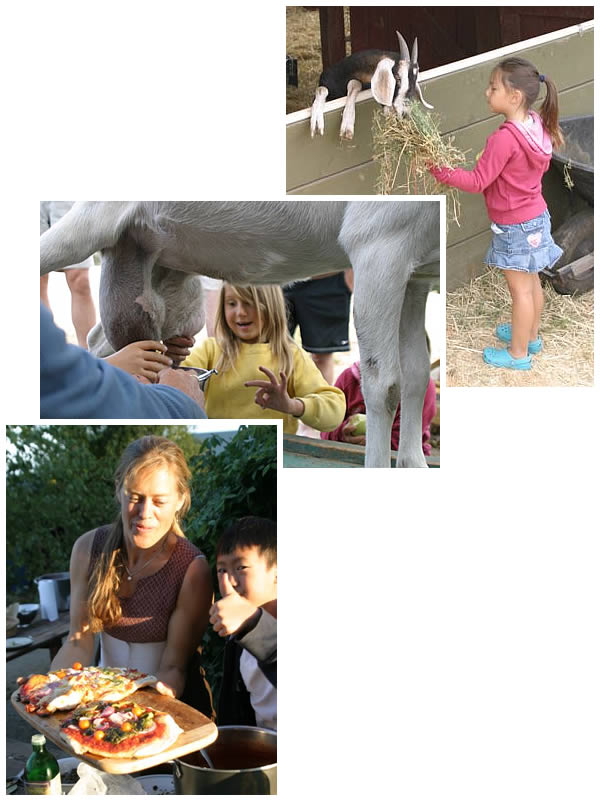
Just a few scenes from last weekend's Mini-Camp on the farm! The pictures speak
for themselves.


<back to top>
What's in the box this week
~~~~~~~~~~~~~~~~~~~~~~~~~~~~~~~~~~~~~~~~~~~~~~~~
Content differences between Family and Small
Shares are underlined and italicized; items with a “+” in
Family Shares are more in quantity than in Small; anticipated quantities are
in parentheses. Occasionally the content of your share will differ from what's
on this list, but we do our best to give you an accurate projection (see
above).
Family Share:
Basil
Baby carrots
Cucumbers (Armenian or regular)
Eggplant +
Green beans +
Lettuce +
Peppers
Potatoes
Tomatoes (Heirloom and dry-farmed) +
Cherry tomatoes
Strawberries
Small Share:
Basil
Broccoli
Eggplant
Green beans
Lettuce
Potatoes
Tomatoes (Heirloom and dry-farmed)
Cherry tomatoes
Strawberries
Extra Fruit Option:
Strawberries, raspberries and blackberries
"Strawberry Bounty" Option:
-- stopped for now; will resume with next strawberry flush! --
<back to top>
Notes from Debbie's Kitchen
~~~~~~~~~~~~~~~~~~~~~~~~~~~~~~~~~~~~~~~~~~~~~~~~
Click
here to go to my extensive
recipe database, spanning 10 years of CSA recipes and alphabetized
by key ingredient. Includes photos of most farm veggies; helpful for
ID-ing things in your box!
Did anybody try the ‘eggplant in the waffle iron’ technique
I talked about last week? If not, you still have time, as we’re still getting
eggplant (yipee!). Here’s what I did with my ‘waffled’ eggplant:
since I made the slices in the morning (to ‘test’ it out before writing
to you), I wasn’t ready to eat them yet, plus I hadn’t quite figured
out what I wanted to do with them either! So I laid them on a plate, covered
and refrigerated them, waiting for inspiration to strike. And strike it did!
It came to me when I was struggling to figure out what to pack myself for lunch
before heading to the farm: an “ELT” – sort of like a BLT,
only substituting the ‘waffled’ eggplant for bacon. I had some left-over
baguette from dinner the night before, so I split this lengthwise, spread on
some mayonnaise, added the eggplant slices, some sliced tomato, and lettuce.
I also added a little chevre, just for fun, but I could see using different cheeses,
or no cheese at all, to equal success. Needless to say, lunch was delicious!
The other night I went to my recipe
database (yep, I use it too – all the
time!) looking for ideas for potatoes and green beans. What I found
was an idea I’d come up with back in 2004 I’d called “Instead
of Pasta” which I’d all but forgotten. The idea was originally inspired
by “Ugly
Green Beans” (yet another recipe), which involves cooking
green beans like they were garlic fries – I think you’re starting
to see how I think here, as now comes the potato part – so I thought, a)
why not cook green beans and potatoes together, a sort of ‘fries combo’?
And b) hm, I bet they’d be good as a bed for some sort of tomato sauce...
ergo the ‘instead of pasta’ idea is hatched! Click on the link above
to see the recipe if you want steps, timing and oven temperatures. Otherwise
if you’re a reasonably self-assured cook you can probably just make this
based on the description.
Roasted peppers make a great addition to chili. Have a favorite chili
recipe? If so, simply chop up and add a bunch of roasted peppers to the mix for
a greater flavor dimension. If not, I’ll tell you how I made mine, but
in a minute; first: how to roast peppers. It’s
simple really; the idea is to blister the thin, cellophane-like skin on the surface
of the peppers and then remove it. This process also enhances the flavor of the
peppers. So, put your peppers, whole, onto your barbecue grill, or in your toaster
oven, or even on a long-handled fork (or tongs) over your stove’s gas burner
or backyard fire pit. Cook them, turning as needed, until mostly blackened and
blistered on all sides. You don’t want to char them so much that you convert
the flesh beneath the skin to carbon too, but the flesh will darken in places
and this is fine. You’ll get the hang of it.
Once the peppers' skins are satisfactorily blistered, put them inside a paper
bag and close it up. Set it somewhere to rest 10 – 15 minutes or so. This
does two things: the heated moist flesh of the peppers ‘steams’ the
skins, further loosening them, plus the wait allows the peppers to cool enough
for you to handle.
Next step is to remove the stems, seeds, and blackened skin, leaving behind the
luscious, glistening roasted pepper flesh for cooking with! Here’s how
you do that: take a pepper out of the bag and lay it on its side on a cutting
board. Hold the pepper down lightly with one hand while gently tugging on the
stem with the other. In most cases, the stem and all (or most) of the seeds inside
will ploop out all in one piece. If it resists, use a sharp knife to cut it away
(but you shouldn’t have to). Now carefully remove the skin. There are several
ways to do this, so try different ones until you find the one that works easiest
for you. I usually slit one side of the pepper, open it up and lay it out skin-side
up, then with a knife or my fingers, scrape/peel the skin away. Sometimes I can
grab an edge of skin and peel off largish pieces, much like peeling the label
off a sweaty beer bottle. Sometimes I’ll pick the pepper up and work with
it like a crack-and-peel label. Hold the pepper, with a couple fingers inside,
and kind of roll the flesh; the cooked skin (if more charred) is stiffer and
will not roll equally with the soft flesh, and so can be easily rubbed, picked,
or peeled off.
Once that’s done, they’re ready to use! Not ready to use them now?
Want to save ‘em for later use? Easy. They freeze well. Either lay them
flat on waxed paper on a cookie sheet, freeze, then decant to another bag or
container and store in the freezer, or (this is what I did last time, as I’d
roasted a whole bunch at once) oil up the cups of a muffin tin and drop a few
pieces into each cup. Push ‘em down so there’s not a lot of air pockets,
then freeze. Then like above, decant them into another container and store in
the freezer (If they stick, set the bottom of the muffin tin in a scant half-inch
of warm water in your sink, just until they loosen). This way you have manageable
units of frozen roasted peppers, rather than one big chunk.
Debbie’s Ground Beef and Roasted Farm Peppers
Chili
Onion, chopped (medium sized, or half a big one)
Ground beef (I used a 1lb. pkg. of my Morris
Grassfed Beef)
Salt
Garlic, minced or crushed (as much as you like!)
Some ground cumin
Some ground red chili pepper
Half a dozen or more peeled farm tomatoes, chopped [dont’ know how to peel
a tomato? See end of recipe]
A can of cooked pinto beans (or cook your own)
A bunch of chopped up roasted peppers [see above for how to roast them, if you’re
jumping to this recipe from the database]
A generous handful of chopped fresh cilantro (optional)
Pat ground beef dry, break apart with your hands a bit, sprinkle with salt and
set aside. In a large heavy skillet over medium heat, sauté onion in some
olive oil, until starting to brown. Crumble ground beef over this and cook, stirring
occasionally, until beef is also starting to brown (this way you kinda continue
to caramelize the onions while the beef is cooking). Add garlic, stir and cook
another minute or so. Sprinkle on some cumin (maybe ¼ tsp), and chili
powder (less if you just want that ‘chili’ flavor, more if you like
more heat). Add chopped peeled tomatoes and any accumulated juice and cook awhile
(covered, if you like) until the tomatoes start to disintegrate. Add the can
of pinto beans, bean liquor and all (i.e. the liquid in the can). Add the chopped
roasted peppers. Cook and stir until heated through and bubbling. Turn off the
heat and add the optional chopped cilantro at this point. Serve with a bunch
of corn tortilla chips, which can be used to scoop and eat the chili with! This
also would freeze well for later use.
How to peel fresh tomatoes: put a pot of water on the stove to boil, and set
a bowl of cold water nearby (you can add ice cubes if you like, but it’s
not required, cold water is sufficient). Have a sharp knife and slotted spoon
handy. With the knife, cut a small slash in the bottom of each tomato, then drop
them gently into the boiling water. Boil for 30 seconds or so (watch them; if
you see the skin crack or split sooner than 30 seconds, go ahead and take ‘em
out. They’re ready), then transfer to cold water to stop the cooking. The
skins will now peel off easily. You can cut out the core after, or before dropping
into the boiling water, either way.
Member Kirsten Nelson sent me this innovative solution for using a myriad of
odd left-overs; this is also a good demonstration of truly ‘cooking with
what you have.’
Kirsten Nelson’s Tomato-Bread Salad with Pesto
and Mozarella
“Last night I got home late from work and was rushing to put dinner together.
No lettuce, the artisan bread had gone a bit stale and the pesto (made from LEF
basil a week or so ago) needed to be used that night. We did have some fresh
mozzarella perlini. So I cubed the bread (this was sourdough whole wheat), chopped
up an heirloom tomato, a green pepper, an onion, threw in some cherry tomatoes,
the fresh mozzarella and tossed everything with 2 tablespoons (-ish) of pesto,
and two tablespoons of balsamic vinegar. Added some fresh ground pepper and sea
salt to taste, tossed some more, then let sit for 5 to 10 minutes. Voila, bread
salad.”
Julia Wiley of Mariquita Farm (part of Two Small Farms, a sister CSA) and I occasionally
share recipes... well, okay, we poach them from each other’s websites,
but with permission! Here’s one she put in a recent newsletter that I really
liked the sound of:
Julia Wiley’s Gringa Sopa
"Sopa" is what we know as 'Spanish rice' here in the US. The traditional
Mexican sopa you see here in Watsonville is barely pink, usually made with just
a couple of tablespoons of tomato paste, rice, oil, and "knorr swisa",
or powdered chicken bouillon. I like to make my own version of sopa, with more
tomatoes and no bouillon. Here's my recipe. [Note from Debbie: ‘sopa’ usually
means ‘soup’ in Spanish, but I’ve seen recipes for ‘sopa
seca’ translated as ‘Mexican Rice’ (literally, it means ‘dry
soup’).]
2 cups tomatoes, peeled, seeded, quartered and then pureed in the blender. (I've
been known to leave the seeds and skins on....)
3 Tablespoons cooking oil
3 medium/large cipolline or other onions, chopped
2 cloves garlic, chopped
1 teaspoon salt
2 cups raw rice
2 3/4 cups boiling water
Cook the onion in the oil in a large dutch oven with a lid that fits well until
it's soft but not too brown. Add garlic and rice, cook another couple of minutes.
Add tomatoes and salt, stir well, then add the water and cover and cook, covered,
over low heat for 20 or so minutes.
Lastly, here is a wonderful yogurt muffin recipe I make often for breakfast on
the weekends. It calls for blueberries, but I use any and all kinds of farm fruit
with great success.
Berry-Yogurt Muffins
adapted from a recipe in ‘Jane Brody’s
Good Food Book’
1¾ C flour [I like to use part white, part whole wheat pastry flour]
½ tsp. salt
2/3 C sugar [recipe called for ¾ C, but I use less]
2 tsp. baking powder
2 eggs
¼ C melted butter
¾ C plain yogurt
1½ C berries (originally blueberries, but I use blackberries, raspberries,
or a combination of the two; I’ve also made this with cut up strawberries,
peaches, apricots, plums or bananas!)
Combine flour, salt, sugar and baking powder. In a separate bowl, beat eggs;
add butter and yogurt. [I usually use the two-cup measure I measured the yogurt
in, then drop in the eggs, whisk with a fork, then add the melted butter and
whisk again.] Combine egg mixture with dry ingredients, mix only to moisten.
Fold in fruit. Fill muffin tins 2/3 full. Makes 12 regular muffins. Bake at 375
degrees for approximately 25 minutes. [I have a ‘Texas-sized’ muffin
tin, which makes six big muffins. They only need to bake about 5 minutes longer.]
<back to top>
Calendar of Events
~~~~~~~~~~~~~~~~~~~~~~~~~~~~~~~~~~~~~~~~~~~~~~~~
(see calendar on website for more info)
<> Sat. Jun 23 Summer Solstice Celebration (click
here for a wonderful movie of this year's celebration!)
<>Friday Aug 10, 17, 24, 31, Sept 7 and 14 Mataganza
Garden Sanctuary Internship Program
<>
Sat. Oct 20 Fall Harvest Celebration
<back to top>
Contact Information
~~~~~~~~~~~~~~~~~~~~~~~~~~~
email Debbie at the farm: farmers@cruzio.com
email Debbie at home (with newsletter input or recipes): deb@writerguy.com
phone: 831.763.2448
web: http://www.liveearthfarm.net
~~~~~~~~~~~~~~~~~~~~~~~~~~~